Overview
This is the official documentation for the Facebook Product Feed Shopify app.
The app’s purpose is to sync your Shopify store with your Facebook product catalog. It provides you with an always up-to-date data feed that contains your Shopify products/stock in a format that Facebook understands.
While the app is set-and-forget it is still geared towards marketers and in that sense technical users. So be warned ;-)
Gotchas
There are a few thing to note about how we generate the data feed to be consumed by Facebook:
Shopify Variants as Facebook Products
In Shopify there is no such thing as a product with a price. Only variants have prices. Each product has at least a single variant. That is why we are mapping what Shopify calls variants to what Facebook calls products.
Limitations of the free version
The free version of the app is limited to 1000 Shopify products – including ALL their variants.
Example:
On your shop you are selling 1000 different T-Shirts as products, each comes in two sizes and two colors.
That would make 1000 × 2 × 2 = 4000 variants and thus your feed will contain 4000 Facebook products/items.
That is why even though the number of products is limited the actual number of items in the feed can vary widely.1
For shops with a lot of variants per product the feed can grow very large very quickly.2
Overcoming the Limits!
You can work around the limit and achieve unlimited number of products 3 in your Facebook product catalog. To do this you need use a (premium) feature called feed pagination.
Mapped fields
The following variant options will be automatically mapped to the respective facebook product feed fields:
- title
- description
- color
- size
- pattern
- material
- gender (the only values allowed by Facebook are “male”, “female” or “unisex”. The app will ommit the gender field if another values is set.)
Other Shopify fields
- product_type
- brand
- gtin
- mpn
- price
- google_product_category
- compare_at_price and sale_price Premium feature
- product tags Premium feature
Facebook fields
- custom labels Premium feature
- availability (will be either “in stock” or “out of stock”)
- condition (will always be set to “new”)
- item_group_id
- shipping_weight
Google fields
- google_product_category
- custom labels
- age group
- condition
- gender
Advanced Settings and Query Strings
Most of the advanced setting are configured via query strings (Wikipedia link). You have to append the resp. query string to your feed’s url. The setting can be combined. The first parameter has to be prepended with a question mark (?), all others with a ampersand (&).
For example:
https://YOURSHOP.myshopify.com/a/feed/v2/facebook.rss?collection_id=12345&no_variants
Core Features
Google Product Categories
If you want to use and set the google_product_category (and avoid the “Missing Property: google_product_category is missing” warning) you can use shopify’s own Google Shopping Sales Channel to do so.
The app will pick those up and use them in the product feed.
Alternative: Use metafields directly
The Google Shopping Sales Channel mentioned above is saving the categories into certain product metafields. We are just re-using those metafields for the feed.
You can also set those metafields directly. The product metafield you would have to add the category name to have the following namespace & key
| metafield namespace | metafield key |
|---|---|
facebook |
google_product_category |
Alternatively the metafields with the key google_product_type or google_product_category from the google or mm-google-shopping namespace work als well.
You can edit them via one of the many metafield apps. Or you can use Shopify’s own bulk editor:
Technical deep dive: Rules for setting the google_product_category
The rules by which the google_product_category determined are the following:
- if there is a metafield with the key “google_product_category” in the namespaces “facebook” of the variant - we’ll use that
- else if there is a metafield with the key “google_product_category” in the namespaces “facebook” of the product - we’ll use that
- else if there is a metafield with the key “google_product_category” in the namespaces “mm-google-shopping” of the product - we’ll use that
- else if there is a metafield with the key “google_product_category” in the namespaces “google” of the product - we’ll use that
If that ways we don’t find any metafield with the key “google_product_category” we repeat the 5 steps above with the metafield key “google_product_type”.
Other Google Fields
We will also use any “custom label” fields (custom_label_0, custom_label_1, custom_label_2, custom_label_3, custom_label_4), condition, age_group and the gender field that you set with the Google Shopping Sales Channel.
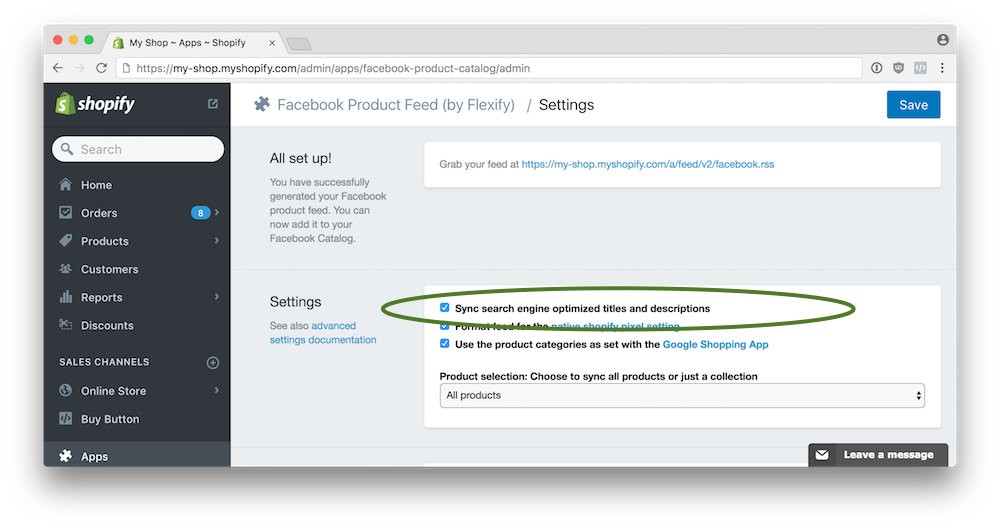
SEO Titles and Descriptions
You can use your search engine optimized titles and descriptions instead of the regular ones.
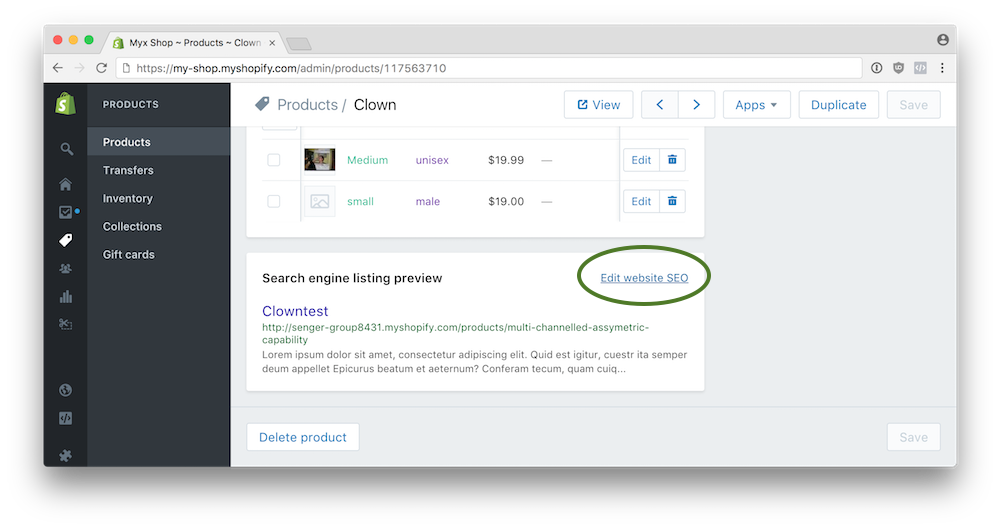
To enable this setting check the checkbox “Sync search engine optimized titles and descriptions” on the app’s admin dashboard.
First Available Variant
Include only the first product variant that is available for purchase.
The default feed contains all variants of every product in the choosen collection. If this setting is enabled your feed will only include one variant (the first one that is available for purchase) per product.
Query string: no_variants
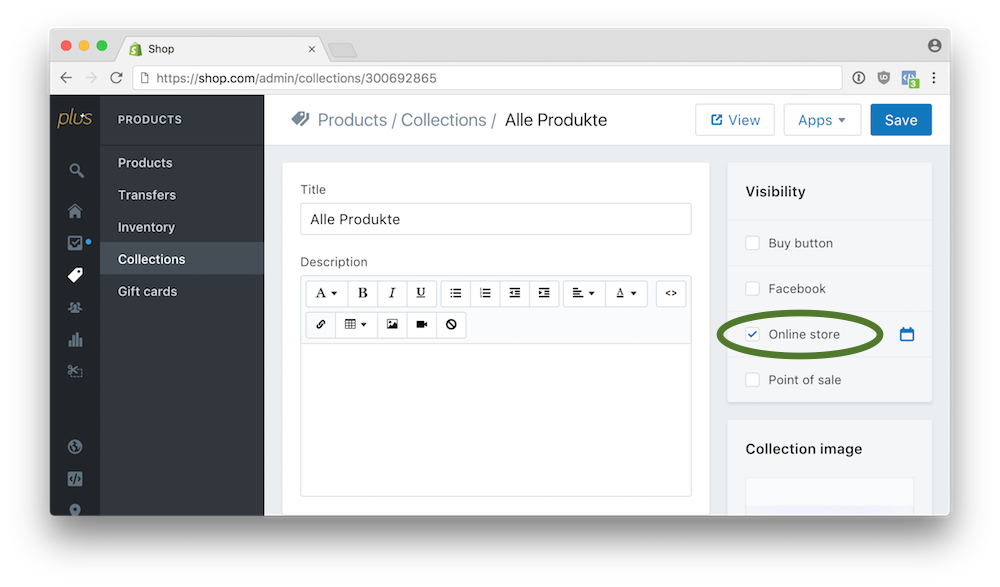
Set Base Collection
Generate a feed using a specific collection specified by its collection ID. You can use this to generate mulitple different feeds. This will override the setting from the apps dashboard.
Query string: collection_handle=XXXXXX
Where XXXXXX is the collection handle. You can find that handle by visiting the collection page on your store front. It should be the last part of the URL you see in your browsers’ adress bar.
Alternatively you can specify the collection by its ID:
Query string: collection_id=XXXXXX
Where XXXXXX is the numeric id of the collection. You can find that ID when you visit the collection in shopfiy admin. It should be the last part of the URL you see in your browsers’ adress bar.
Note: The collection’s visibility needs to be enabled for “Online store” in order to be used as the basis of the feed.
Downcase
Downcase product titles and descriptions. Converts product/variant titles and descriptions to all lowercase.
Query string: downcase
Premium features
Unlimited Products via Feed Pagination
Due to technical reasons we have to limit the size of a single feed. For shops with a lot of products and a lot of variants the feed can grow very large very quickly. 2
But you can work around that limit with a feature called feed pagination.
100.000 products? No problem!
Using feed pagination you can generate facebook product catalogs of any size containing all the products and variants you have.
It will split up your store’s items into multiple feeds. You can then add those feeds to the a Facebook product catalog where they will get combined into a single product set.
Splitting up the feed.
Two paramters need to be set:
limit– The number of Shopify products per feed page (default is 500)page- The feed page number
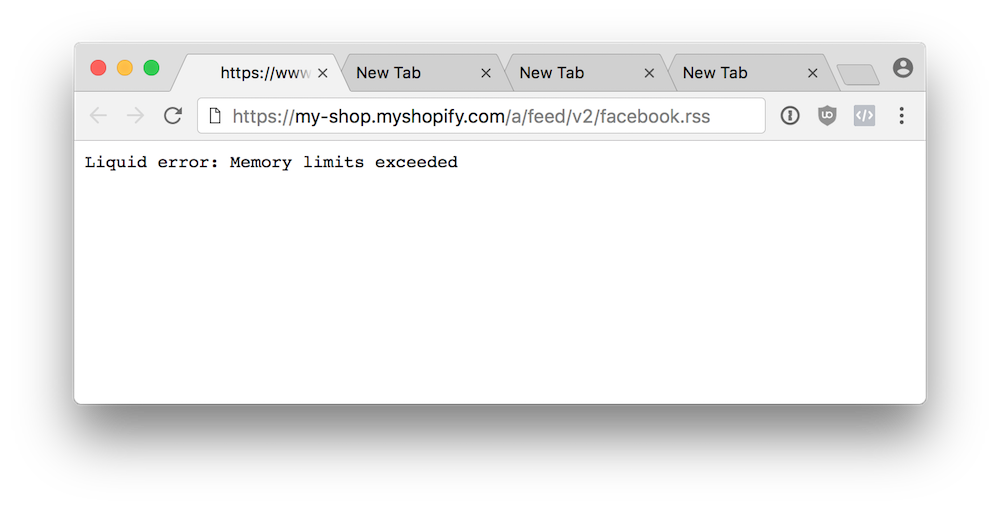
The limit paramter limits the number of item per feed. This is sometimes needed to work around the “Liquid error: Memory limits exceeded” or “No Valid Column Names” or “No Column Labels Detected” errors. These errors can occur if there is a relatively large number of variant per product.
1 - Sanity check
Visit your following url in your browser
https://YOURSHOP.myshopify.com/a/feed/v2/facebook.rss?limit=500&page=1
-
If you see a
Liquid error: Memory limits exceedederror message, decrease thelimitparameter above (e.g. from 500 to 200) and try again. Repeat until the error is gone -
If you don’t see a
Liquid error: Memory limits exceededmessage you can continue
2 - Check how many pages you have
If you visit the url you found out above in your browser and “view source” you will see something like this
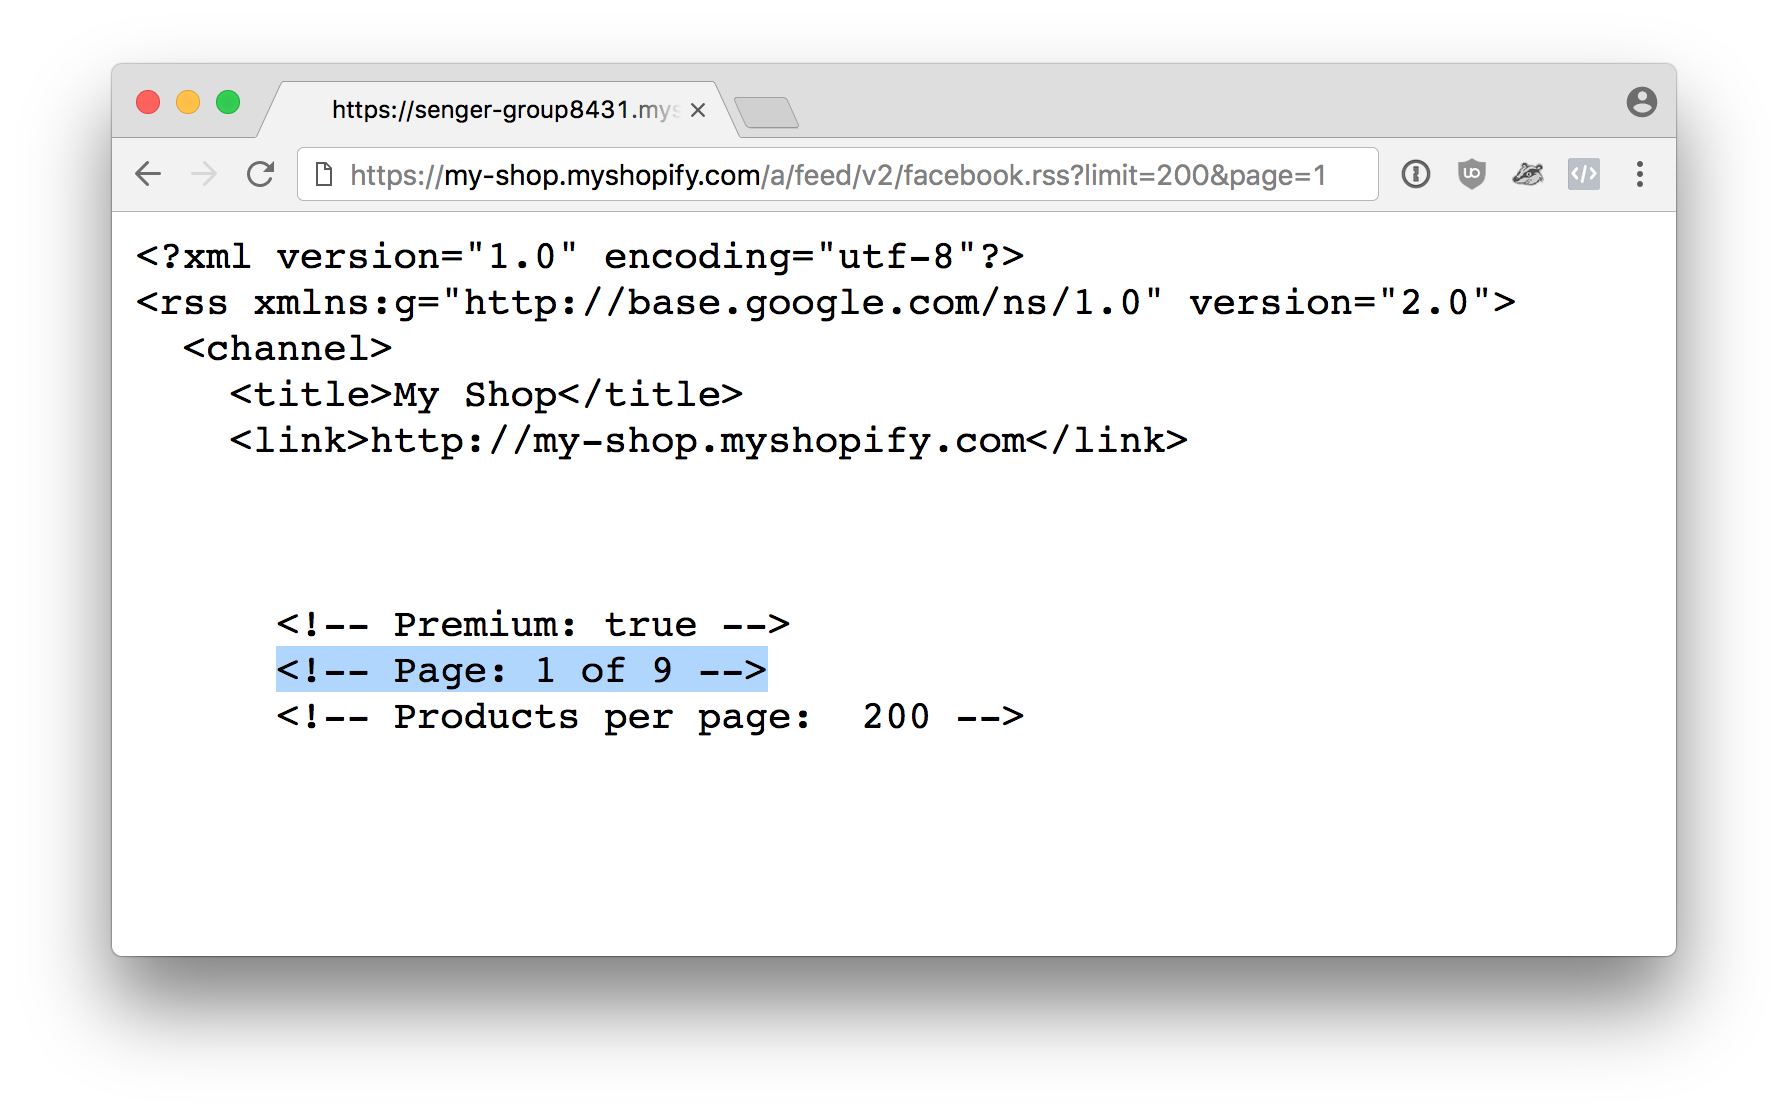
On the top of the page (highlighted in the screeshot) you can find the number of pages your feed will be split into. In the example above we choose a limit of 200 products per page. That limit resulted in nine (9) pages. Thus, the following feeds will already be available:
https://YOUR_STORE_DOMAIN/a/feed/v2/facebook.rss?page=1
https://YOUR_STORE_DOMAIN/a/feed/v2/facebook.rss?page=2
https://YOUR_STORE_DOMAIN/a/feed/v2/facebook.rss?page=3
https://YOUR_STORE_DOMAIN/a/feed/v2/facebook.rss?page=4
https://YOUR_STORE_DOMAIN/a/feed/v2/facebook.rss?page=5
https://YOUR_STORE_DOMAIN/a/feed/v2/facebook.rss?page=6
https://YOUR_STORE_DOMAIN/a/feed/v2/facebook.rss?page=7
https://YOUR_STORE_DOMAIN/a/feed/v2/facebook.rss?page=8
https://YOUR_STORE_DOMAIN/a/feed/v2/facebook.rss?page=9
Combined, those feed contain all of your products and variants. Upload them to your facebook product catalog and you’re good to go.
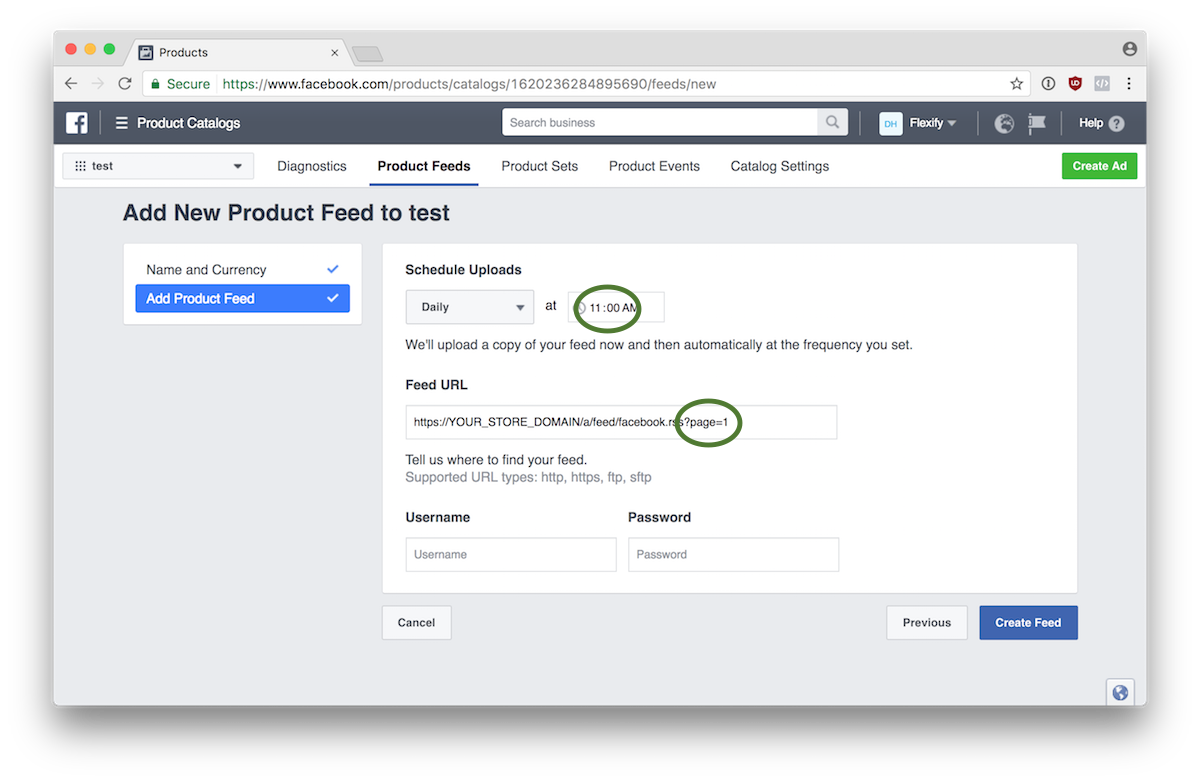
3 - Upload all the feeds
Add all feeds, on by one, to the same product catalog.
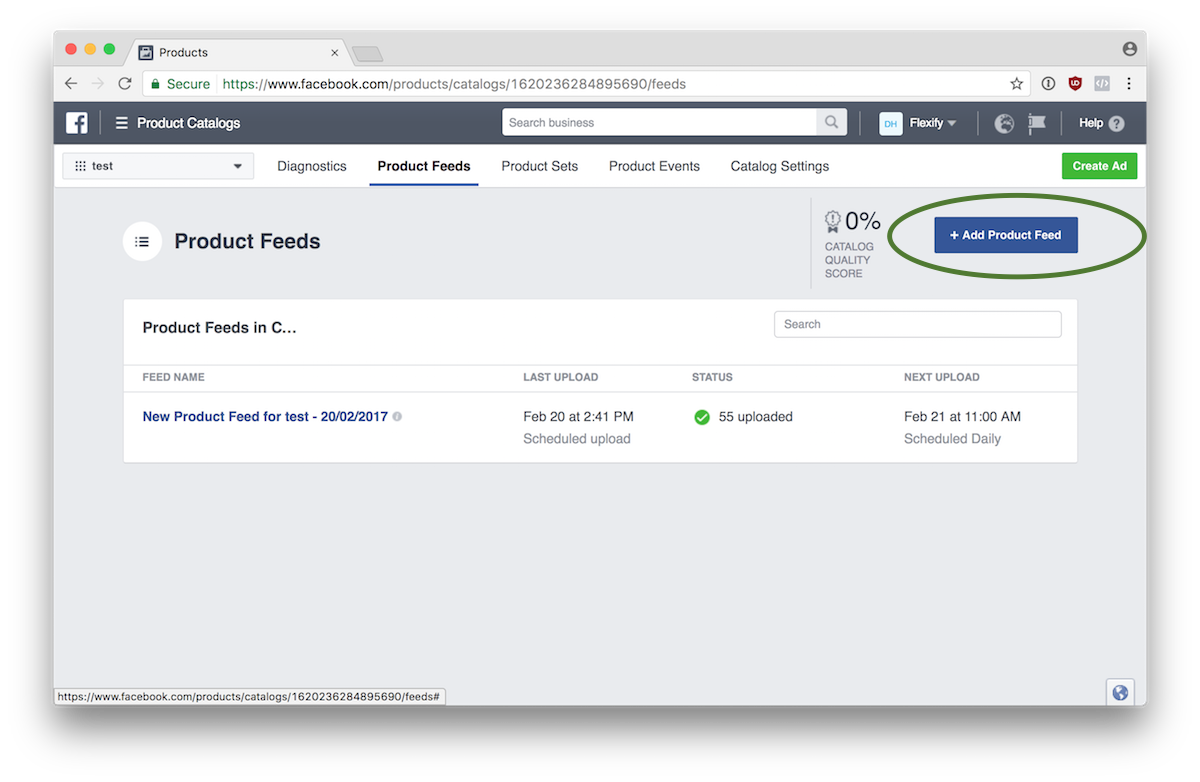
Make sure to set the scheduled upload time to be the same for all feeds. This will minimize the risk of sync errors.
Set Custom Labels
Facebook lets you set up to five custom labels for each item/product in your product catalog. The app has multiple ways to set those custom labels
Via Google Shopping Sales Channel
You can re-use the custom labels you have set with the Google Shopping Sales Channel.
Manually set custom labels
To input your custom_label data you need to attach corresponding metafields to your shopify shop, products or variants.
| metafield namespace | metafield key |
|---|---|
facebook |
custom_label_0(or custom_label_1, custom_label_2, custom_label_3 or custom_label_4) |
There are three levels where you can specify your custom labels.
- Shop level
- Product level
- Variant level
The more specific/higher levels override the less specific/lower levels.
- If you specify a label on the shop level, every product in your shop will have this label
- If you specify a label on the product level, every variant of this product will have the label – overriding the shop level label (if it is set)
- If you specify a label on the variant level, just this variant will have the label – overriding the product or shop level label (if it is set)
You can use shopify’s bulk editor to
For now, to set a custom label on the shop level you would have to use one of the many third party meta field editor apps out there, e.g. shopifyfd
Map product tags to custom labels
You can also use your existing product tags as custom labels.
Option 1 - Map each tag to a custom label
To enable this mode add the query parameter product_tags_as_custom_labels to your feed url, e.g.
https://yourshopurl.com/a/feed/v2/facebook.rss?product_tags_as_custom_labels
This will preserve the order of your product tags. For instance: If you set the products tags t-shirt, dinosaur, sales in Shopify the following will appear in your feed:
<g:custom_label_0>t-shirt<g:custom_label_0>
<g:custom_label_1>dinosaur<g:custom_label_1>
<g:custom_label_2>sales<g:custom_label_2>
Remember that there cannot be more than five custom labels (numbered from 0 to 4) in total. Any product tag after the fifth one will be ignored and not mapped to a custom label.
Option 2 - Map ALL tags to the first custom label
To enable this mode add the query parameter product_tags_as_custom_label_0 to your feed url, e.g.
yourshopurl.com/a/feed/v2/facebook.rss?product_tags_as_custom_label_0
This will add all product tags, separated by a comma, to custom_label_0
<g:custom_label_0>t-shirt,dinosaur,sales<g:custom_label_0>
Specify Product Images
You can now specify which product images should be used in the feed.
The way this works is by leveraging the alt texts of your product images and the following naming convention:
- If you add an image to the product and enter
fb-feedas the alt text it will get picked as the product image for the feed (for all its variants) - If you want to assign images on a variant basis you can use values like
fb-feed_12345as the alt text where 12345 is your variant Id. The image should then get picked as the variant’s image for the feed.
Alternative: Specify any image using Metafields
You can add arbitrary images to your products. To input your image URLs you need to attach corresponding metafields to your shopify shop, products or variants.
| metafield namespace | metafield key |
|---|---|
facebook |
featured_image |
There are two levels where you can specify your custom labels.
- Product level
- Variant level
The more specific/higher levels override the less specific/lower levels.
- If you specify an image on the product level, every variant of this product will have the image.
- If you specify an image on the variant level, just this variant will have the image – overriding the product level image (if it is set)
You can use shopify’s bulk editor to
Automatic Image Resizing
Note: If you subscribed to the paid plan before we introduced this feature you will have to first deinstall and then reinstall the app to make sure you are in the lastest plan that enables the new usage based billing for the image transformations.
Don’t you hate it when your product images get cropped in your facebook ads? This happens because facebook needs a square image for product/carousel ads and to get it they just cut off some pixels from the edges of your images like this:
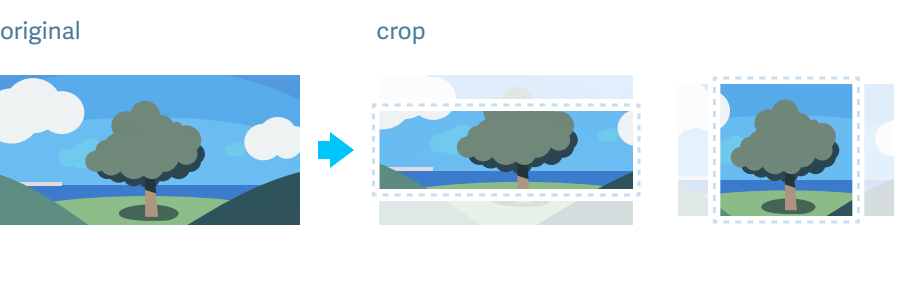
What you actually want most of the time with product images is to “add some pixels”.
Affine Clamp
The most convenient way to do this without cropping or distorting the image is to fill the remaining space with extended pixels from the edge of the image. This image transformation is called an “affine clamp” (in case you wanted to know).
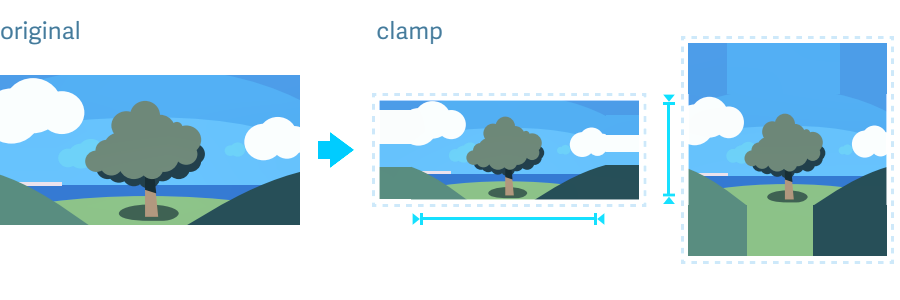
This transformation works nicely with images that show products that have been presented against a uniformly colored background.
Solid Color Fill
It could also be that you alsways want to fill up the remaining space with a solid color. We also support that.

Even more options
You can also do fun stuff like this

How to use it
To replace every image with an automatically resized image use the feed at
https://YOURSHOP.myshopify.com/a/feed/v2/facebook.rss?image_optimization=carousel
for square images optimized for facebooks Carousel format. This results in images with 600x600 pixels.
or
https://YOURSHOP.myshopify.com/a/feed/v2/facebook.rss?image_optimization=single
for images optimzed for facebooks Single Image format. This results in images with 1200x630 pixels.
(replace YOURSHOP.myshopify.com in the linsk above with your shop domain)
The default is to use the “affine clamp” transformation. If you want to use “solid color fill” instead you need to append an additional query paramter to the feed url with the color value.
image_bg=FFFFFF
Valid values are 3-value (rgb), 4-value (argb), 6-value (rgb), or 8-value (argb) hexadecimal colors. In the above example we choose FFFFFF, the Hex value for white.
https://YOURSHOP.myshopify.com/a/feed/v2/facebook.rss?image_optimization=carousel&image_bg=FFFFFF
WARNING: If you use this feature additional charges may apply!
You subscription comes with 500 free transformations every month. For every additional 1000 transformation requests we will charge $4.
A transformation request happens when someone/Facebook starts requesting the actual image urls linked up inside the feed. When that happens the images get transformed/resized on-the-fly.
Once you’ve used up your free image transformations for a month you’ll obtain 1000 credits/transformations for $4. These credits don’t expire. For example: If you need 1100 image transformation request per month you’ll be charged $4 once every ten months only.
Facebook caches all images so a transformation should only be triggered once for every image in your feed.
Still, we cannot control the sources that request the images and the frequency of these requests. After setting up a feed with image transformation enabled you should check the usage on your app’s admin panel (click “Automatic Image Resizing” near the bottom of the page) during the first days to make sure the number of requests are not out of line.
The maximum amount that can be charged per month is capped at $200 for safety reasons. If you need a larger cap, please drop us a line at ten.yfixelf@yfipohs or in the slack channel.
Specify tax rate
If your prices in shopify don’t include tax but you want your prices in your facebook feed to include tax. You can specify a number with which your current prices will be multiplied before being pulled into the feed.
Query string: tax_multiplier=1.05
Compare-at prices
With Shopify you can set a “compare at price” that is higher than the regular price. Facebook has it the other way round. Here you can set a “sale_price” (see their spec).
If you enable this setting the following will happen
- Shopify’s “compare at” price will be mapped to facebook’s “price” field
- Shopify’s normal price will be mapped to facebook’s “sale_price” field
Query string: compare_price
-
Due to technical reasons we cannot limit the feed by the number of variants resp. the actual items in the feed. We would like to, but shopify is not providing us the information we would need to do that. ↩
-
This can sometimes even result in an error when requesting the feed: See “Liquid error: Memory limits exceeded” ↩ ↩2
-
Facebook obviously has a (soft) limit of 5 million products per catalog (see their docs). ↩